

ejtnt
-
Content Count
27 -
Joined
-
Last visited
Posts posted by ejtnt
-
-
Sorry, I was trying to attach a pic on my post above but failed. Here is what I meant:

Flip the spacer marked in red.
-
A couple of points on the chassis. I have a pro version that has become my main car. The upgrades you chose are really good. I think that not all of them are necessary but you have already included the most important ones (slipper clutch, stabilizers, cvds).
An interesting thing about the slipper clutch. You can actually use the tb-03 spur (item 51536). You will actually need an adapter but this already provided with the kit. That is part J6. This will actually allow you to stay close to stock gearing, use 0,6 pinions and still use the slipper.
Another thing about the slipper clutch. When assembling it, put a few shims and flip the bottom spacer around. This will allow you for easier allignment of the nut and reduce the risk of bending the slipper clutch screw.
-
 1
1
-
-
I have an almost full option TL-01 that I got back in 2001 I believe. I still drive it regularly. I converted it to brushless/Lipo a few years back and it is such a simple fun car to drive. It still remains competitive against tt-01 and tt-02 but certain parts are almost impossible to find or too expensive. I need to take a few pictures of it. It currently has an HKS altezza body (it originally came with the Opel V8 that I proceeded to trash within a few months) but I see a new body for it in the near future.
-
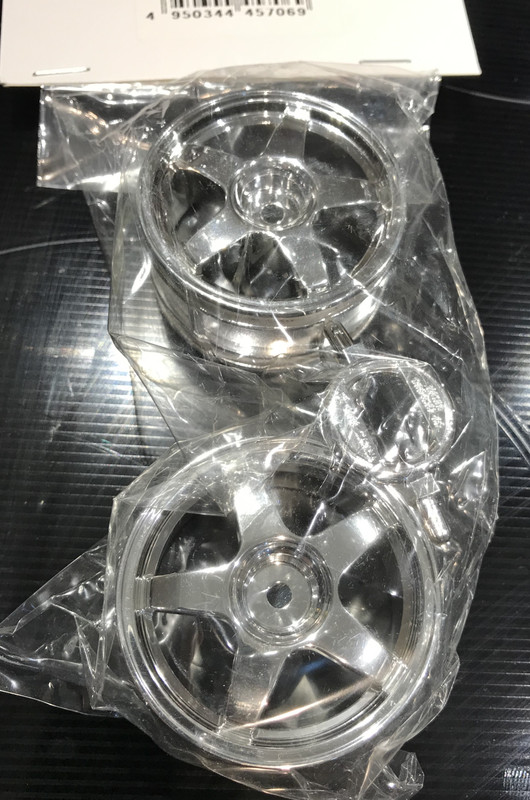
On 1/14/2019 at 8:44 PM, acprc said:So just to keep you all updated. The TGS restoration continues. The body is off getting painted in PS-59 Dark Mettalic Blue and I have been collecting some finishing parts. Managed to find one set of wheels
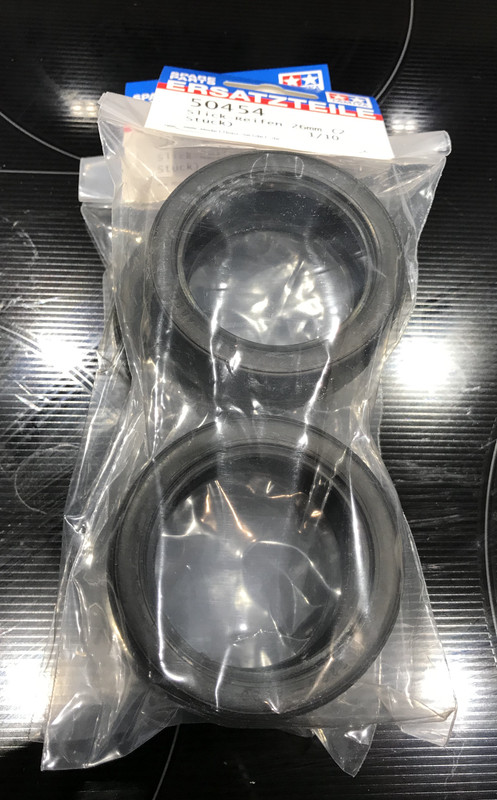
And the tyres
That’s pretty much all the parts I need apart from another set of wheels. They were hard to find last time I needed a set but will keep looking. In the mean time I will be starting another build thread as I start to restore a TNX 5.2r Champagne Gold Edition this weekend.
I am sorry to be the one to break it to you, but those tires offer very poor traction. For a similar look but with a lot grip I would recomment Super slicks (tamiya partno. 53220) or M2 Slicks (tamiya 53224). The M2s are not as grippy but they offer a bit more life.Oh, and a heads up. You would have to get inserts for those. The tires do not come with them. My recommendation here would be Tamiya part No. 53156
-
14 hours ago, svenb said:I have 4 or 6 pairs of 53209 hidden somewhere!
I need 4 sets, so if I find the other 2 I'll let you know.
I need a pair of 53216!
Then you are in luck my friend. There is a guy local to me that he is selling 2 pairs. His price is 15€ per pair. A little expensive if you ask me, but if you are up for it I could get them for you and ship them to you if you take care of the shipping cost. It should be around 10€.
-
On 11/9/2018 at 12:24 PM, svenb said:How many are you after?
2 sets!?
Sven
2 sets would be great! Which do you have?
-
Hello everybody! Does anybody have any 26mm shaped foam tire inserts? Any of the following items: 53250, 53209, 53834, 53835. Do not worry about your location, as long you are reasonable with the price I should be able to take care of everything else.
-
It only took me 4 months to get around to it. The TL-01 turnbuckle set I have is probably to short for the TL-01B. It measured at 38mm for the actual turnbuckle and with the stock plastic ends it can be set between 56 to 63-ish mm, possibly a bit more. Would that be something interesting for you?
-
1
-
-
Thank you all for the information. I will give the Tamiya acrylic paints a go. I will post some of my results. I already have a 70's challenger and a Porsche 934 rsr in the pipeline so I will post the results.
-
If I may ask, what surfaces are you planning to run on? For unprepared parking lot tarmac, anything from HPI would work ok. Also other generic hard plastic tires e.g. anything from Hobbyking would work ok too.
For carpet or indoor cement, I would recommend something more suited to the rest of your setup. MST offers a wide variety of tires with different amount of grip, so I guess it would depend.
-
I thought it was not possible to spray TS paints (regardless of clear or not, gloss or flat) over acrylic paints without having them dissolve. Or is it enamels that don't play well with the TS paints. Anyways I read somewhere that Tamiya will release the equivalent of TS paint, but in a liquid form so people can use them for airbrushing and maybe hand-brushing. I would be willing to try these out.
Also why and how do the clear TS paints, mess decals?
-
Hello everybody,
let me start that by saying that I am not sure if this is the right place for this thread, so if it needs to be moved please feel free to do it.
So, even though I have been in RC and static models for almost two decades now, I have never got into using acrylic paints on plastic models. Enamels has been all I used and quite honestly, I am not particularly fond of them. That is the reason why I have mostly stuck to smaller scale models.
That said recently, I started entertaining the idea of getting back into more into static modeling (mostly motorsport) and also getting a couple of old school RC kits that come with plastic bodies instead of lexan.
I am no stranger to tamiya TS spray paints but for the first time, I would like to use acrylic paints for detailing, instead of enamels. I have no plans in using an airbrush, so I will be sticking to using hand-brushing.
I have read in many places that tamiya acrylics are not that great for hand-brushing. Is that true? Should I avoid them?
I have also read that the formula of tamiya acrylic paints has changed in recent years, and they can now produce better results. Is this true?
Moreover, if you would not recommend tamiya acrylic paints, what could be a good alternative? I hear testor's/model master being mentioned quite a bit. Are there any other brands you would recommend. Please keep in mind that I am based in Germany, so access to certain brands might be limited.
Thank you so much in advance.
-
Welcome guys! Very happy to see you here. I am a very big fan of your store and do the majority of my shopping from you! I hope the expansion goes very well. I was a bit sad when you guys moved to Wustermark, but I have seen a few pictures of the new facilities and I can totally understand it would be impossible to find an equally nice and big facility at a reasonably price here in Berlin.
Are you also planning any meetup/events by any chance?
-
On the subject of wheels, what about these?
http://firebrandrc.com/index.php/on-road-wheel-tires/hypernova-rt9tm-race-treads.html
They look spot on for what you are looking for.
I am pretty sure they are 26mm and ABC plastic. The price is ok for coming with tires. I have generally good things about this brand. -
By the way, if you choose to switch to a lipo battery, this is the one with the best specs (at least to my knowledge), that will fit the TL-01. I recently got one, and it is the best 2s lipo I have tried.
https://tamico.de/LRP-ANTIX-5200mAh-76V-LiHV-45C-LiPo-Car-Stickpack
I am not associated with that store in any way, it is just that the LRP website is under maintenance.There are 2 lipos from Carson that also fit very well, but the specs are worse and they are almost at the same price. The second one is the spec battery for the german tamiya eurocup and I can confirm is a very solid battery.
http://www.carson-modelsport.com/de/produkte/elektronik/akkus/produktdetails.htm?sArtNr=500608145http://www.carson-modelsport.com/de/produkte/elektronik/akkus/produktdetails.htm?sArtNr=500608098
-
 1
1
-
-
I remember looking at this thread some time ago. It would be amazing if you could fix the images. I would love to do some thing similar and your documentation of this build was stellar!
-
On 31.3.2018 at 5:10 PM, TurnipJF said:With the extremities, shocks and wheels reattached, the chassis is pretty much done.
The original plastic-ended dogbones have been installed up front for testing.
The 3mm nuts that were previously acting as battery spacers have been used on the tops of the outer tierod screws instead. I gather that the uprights benefit from the extra support as they can crack quite easily around the holes where the tierods attach.
I loved the idea of having the battery holder reversed.
Regarding the ESC and transmitter, I do have a recommendation. Most ESCs will actually fit in belly of the car. The way to achieve this is by removing the upper two screws of the ESC fan and taking half of the body apart and putting it back together. You can then use the little plastic 'shelf', where your ESC is currently sitting on, for mounting the transmitter. Just a heads up, make sure your antenna cable is long enough to reach the holder.
The hole for the mechanical speed controller can allow enough airflow for the ESC. You can use some mesh in order to make sure that no rocks and debris comes in from the hole.
I still haven't checked the length of those turnbuckles. I will by the end of this week.-
1
-
-
19 hours ago, TurnipJF said:Reassembly begins:
What is length of the steering links? I have a TL-01(part. No 53300) trunbuckle tie rod set that is way too long for for the long span arm set for some reason. If you are interested and it fits I would be more than happy to donate this to the build.
-
1
-
-
I have a NIP ball diff if you are interested
-
I have already broken 2 of these (please don't kill me). I would consider a 3rd one hoping that the 3rd time would be the charm.
-
On 18.10.2017 at 12:50 PM, GooneyBird said:Hey, I know that car!
Getting it to handle (for anyone who wants to try the same) basically involved making the weight work to our advantage. The car is heavy, yes, but not much more than a comparably-equipped TT01E, a car I know well. However, unlike a TT, the weight tends to slosh around a lot more. Blame short arms and long dampers. This meant initially that the car was quite a sloppy mess.
The first step to anything is getting the proper tires. When I first laid eyes on the car it had a very pretty set of Enzo 5-spokes clad in Tamiya-spec rubber. Very pretty, and very useless. The de-facto standard tire at this track for touring cars is the Sorex 28. They come pre-mounted on rather unattractive white dish wheels, but boy, do they grip. Also, they last for a full season, and are rather affordable for what they are. Win.
Then came disconnecting the sway-bars. Why, I hear you ask? Well, they were preventing full droop. With such a heavy car you want the weight to help you with traction (think stadium truck), both front and rear. This meant giving it quite a lot of droop to combat understeer on-power, and off-power oversteer. This helped a great deal.
Next up was camber, which we set at (if I remembered correctly) around 1 degree. The short arms, combined with a low mounting point on the chassis (the car's ride height was far lower than Tamiya ever intended) meant that the upper arm was far from parallel to the ground, and there was a lot of camber gain when (not if, when) the chassis leaned into a turn. Going to fairly upright wheels when stationary combatted the (probably rather extreme) camber angles they had in turns, giving the car as much rubber to work with as possible.
Next: rear toe. Initially the car had the wheels pointing nearly straight, probably good for tail-happy rally driving, not so much for indoor on-road carpet running. @Fuijo found a hopup rear arm set that gave the car around 2 degrees of rear toe. Perfect.
This made the car rather drivable. As @Fuijo points out this car will never beat any newer cars which are built specifically for carpet, but for what is essentially a rally car with short, stubby arms it worked rather well. It felt like a slightly heavier version of my TT Cup Racer, which is probably the best one can achieve with this platform.
Really cool thread. As an owner of a rather old Tamiya car (TL-01), I can relate to your pains. I have been lucky enough to be able to keep my car built only with tamiya parts, but I am terrified to run it as aggressively as I used (I ran TCS a few years back against TTs and gave them a pretty good run for their money), since I have broken a few parts that can be hard/impossible to find.
On of those items are the long span suspension arms which brings me to your post. The TBevo arms you are using look almost identical. I see the stabilizer mount is a bit different but this could be worked around. A thousand times thank you for this super useful piece of info! -
This needs to go! New price 20€ with free shipping throughout Europe and UK
-
Some time ago I bought a parts lot on an eBay auction for some very specific parts. The rest is currently available for sale. I open to negotiations on the prices. Shipping will be free within Europe and UK.
Here we go:Tamiya TA04 4mm Clamp Type Alum Wheel Hub (53570) - 10€
Buggy bumper (58107) and misc DT-01 parts - 3€Screws(84175) - 2€
Hobbyking Tamiya male to XT-60 female adapter -1€
TA04 stabilizers (a set of yellow - soft ones and a single rear blue - hard, 53441, 53442) -5€
3,5cm Outdrives and 4,5cm dogbones x2 (I think those are from TL01) - 2€
Plastic big body dampers (I think they are either Kyosho or Carson) - 5€
Aluminum TC dampers (I think they are from carson) - 5€ Two of them have longer ends attached.
Front uprights (I think those are carson for TL01 or DF-03) - 10€
DT-01 steering arm and DT-02 upright and misc screws - 2€
Modelcraft aluminum servo horn (3cm) - 2€
Tamiya Led stopper/holder - 2€
Tamiya female plugs 1€
-
Hello everybody,
I have been following this project for some time since I have been thinking on embarking on a similar project. Somewhere I got lost in the way of this, though. In the end you ended up with a 246mm wheelbase, or did you adjust it again?


Scipunk builds a XV-01 Lancia (and learns a lot)
in General discussions
Posted
Don't bother with the aluminum suspension mount. The carbon reinforced one has less flex and is lighter. The carbon fiber has the most flex, so I would not recommend this either.
The suspension mounts have different toe angle built in them. One is for the front, one is for the rear. I do not remember which is which. I would say that the metal gears are not necessary, but I guess this depends on how you are planing to run yours. Thick diff oil and high powered motor would mean, that the metal gears would not be a bad idea.
The stock hexes are 6mm.
You can use the tb03/tt-02 (part number 51536) spur gear with the adapter provided in the kit (part j5) instead of the spur gear from the slipper clutch. This will allow you to maintain close to stock gearing and the use of 0.6 module pinions (aka the stock pinions). If you choose to use the spur provided with slipper clutch you will need different pinion gears.