

Bvtrinh
-
Content Count
17 -
Joined
-
Last visited
Posts posted by Bvtrinh
-
-
Here’s a teaser video my wife made. Unfortunately I snapped both the carbon fiber rods. I guess they were not made for torsional stress. Time to machine the axles from carbon steel and have them heat treated. Enjoy!
-
 1
1
-
-
I started to paint and design decals for the shell. This is before I had to start over due to not waiting long enough to apply the clear coat.

The electronics are in and ready for testing!
-
I redyed the delrin parts but this time with more salt and RIT Dye More liquid. I was able to hold the water at boiling temperatures for much longer and that seemed to do the trick. I also used a LiPo 2S battery holder from a Yokomo car. It fits nice and snug in there. I also anodized the aluminum parts bronze and made suspension limiters out of 3/8” Kevlar tape. Lastly, I made 1/4” body posts out of delrin and will use 1/4” rubber grommets on the body to make a secure fit and reduce damage in rollover and crashes. I will show that after the body is painted and finished. Last part is to dye the remaining delrin parts and mount the receiver, esc, and bec.
In deciding what body to use, I wanted to remain true to the original Thor body. As such, I went with a Tamiya Hilux shell and extended the bed about an inch. This was the first time I used JB plastiweld and it seems to be holding up pretty well through all the sanding.
-
1
-
-
I have not updated in awhile but it doesn’t mean I have not been working on the truck. It is actually near completion. As usual, I thought of making upgrades to the gear boxes and remembered I had sealed gear diffs from a Tamiya TB04 that was meant for a project that never came to fruition. I measured it and it was very similar to the stock diffs.
I bought a Schumacher 50T delrin spur gear and with a little modification, it fit! I also made the rear drive shafts from a 5mm carbon fiber shaft. Let’s see how the torsional strength is.
The fronts were a little more difficult because I was using Team Associated CVD axles so I had to use their diff cups: one side from the B44 gear diff and the long side from a B44 ball diff (extremely modified). I shaved the diff plate off the cup, inserted a brass insert to reduce the opening, and made another shaft out of the 5mm carbon fiber. Then I held everything together with a pin that a bearing goes over to hold it in. It is also much more durable than the stock diff cups as they are hardened steel! I had to purchase a special drill bit to drill the hole.
And here are the size comparisons:
I also used a replacement counter gear for the overdrive Thorp counter gear for a Tamiya Fox. It was a 46t which allowed me to use a bigger pinion. It also fit much better than the Frog counter gear and is stronger.
And here I am about to put the gear boxes together. What’s the most important thing? Shims, shims and more shims. And gear lube.
My first attempt at dying delrin didn’t go so well. The pieces that turned pink were from a different delrin block.
I bought more Rit dye and was much more successful. I’ll take more pictures tomorrow along with the body I plan on using.
-
Updates:
made new arms using a bandsaw and router this time. Also modified a Hot Racing skid plate for a Axial Yeti.
Now I’m working on the steering. I recycled the TRX-4’s steering linkage and modified a Hot Racing carbon fiber one for the Axial Yeti. I still need to adjust it as it is coming in contact with the sway bar.
-
Thank you! Hopefully I will have time to complete a few other things for the truck this weekend.
-
Minor update. I was a little overzealous when sanding the carbon fiber a took a little too much off. So I put a layer of Camo cotton fabric on it and put epoxy on. I then put several layers of chalkboard clear.
-
Started working on the carbon fiber chassis today. Each side is 5mm thick. I covered it with masking tape to not ruin the finish while I work on it.
Drawing lines and making holes.
I will buy some thin files tomorrow to smooth out the lines and edges.
I used 8mm carbon fiber rods on the chassis. I found out I just couldn’t tap it. I need to get M3 inserts for a secure hold.
Started to assemble it to see how it looks.
And here is the Thor posing next to my almost finished CPE Clodbuster.
Time to disassemble, modify the rear axle shafts to fit the portals, mount the electronics, and more work. I have longer front CVDs coming in so I can make longer front arms and remove the wheel extenders.
-
Thank you! I do enjoy making things. Perhaps one day I will get a 3D printer so the parts can look more professional...
-
1
-
-
Completed the mounting points for the four link suspension. So far, I’m doing a good job of not modifying the Thor to the point of not being able to return it to stock.
I saw a Hot Racing truss for the Axial Yeti which I thought would fit so I started to make the truss/upper link adaptor.
The finish is rough right now but I plan on smoothing it out before dying it. Next, I started making the lower link mounting points and it will attach where the original swing arm did. I also don’t like seeing things go to waste so I reused the TRX-4 link mounting point.
Here’s the modified truss and parts.
Time to assembly it to see how it looks like.
-
1
-
-
Update:
I completed the shock mounts for the front and attached the shocks to see how they fit. It just about bottoms out at the end of the shock travel and now has about two and a half to three inches of suspension travel. A huge improvement over stock and still manages to clear the 540 motor.
The next part might be NSFW for fans of Traxxas. In fact, it might be sacrilegious. I cut the rear axles of the TRX-4 to use the ends as adaptors for the portal axles. I also had a pair of 16mmx13mmx20mm delrin inserts made.
I realized the rear track was longer than the front so I was faced with either making the front arms longer and using longer CVD shafts or removing more materials off of the inserts. I ended up doing the latter and adding a little wheel extensions in the front.
Much better!
And here are the front and rear.
I will work on the mounting points for the four link rear suspension and mock out the chassis in the upcoming week!
-
2
-
-
1 hour ago, nowinaminute said:See, I wouldn't have even thought of making parts like that from scratch. I'd love to make some new arms just to widen the track in conjunction with some longer dog bones. Do you think it would be possible to make something like that with hand tools?
Yes, it is indeed possible. I used a drill press, bandsaw, and a disc sander. I am somewhat dissatisfied with the aesthetics of the arms and plan to redo them after I finish everything.
I have seen some people do a better job with a hand held drill, clamp and hand saw. My hands are not that steady.
-
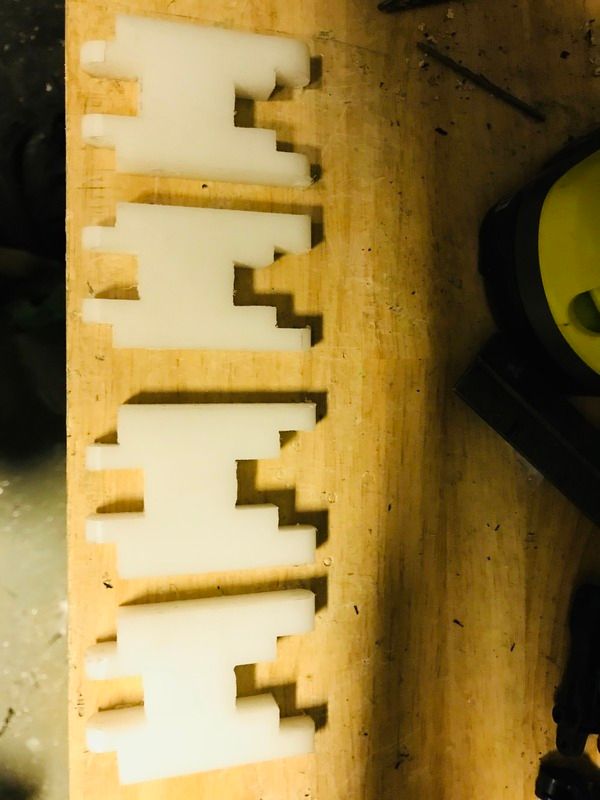
Was able to get the front gearbox together and make the suspension arms!
Bearing carriers
Counter gear from a re-release Tamiya Frog
working on the suspension arms
Done. Not perfect or aesthetically pleasing but it gets the job done!
Time to build the shocks.
Time to focus on the rear.
-
1
-
-
I started a new thread here:
-
Inspired by Nowinaminute and Granndad Stinky on this from this thread here:
Before I knew it, it was all apart.
I knew I wanted to have a four link suspension in the rear, carbon fiber chassis, and oil filled shocks; however, in order to have more torque to move the bigger wheels, I wanted to use the portal axles from a Traxxas TRX-4.
So I started with the fronts. How was I going to retrofit a CVD driveshaft? Luckily, I had a B44 where I could measure the CVD and it looked like it would fit. The only thing I had to do was enlarge the pin to 2mm on the B44 axle and enlarge the opening on the CVD end. This is what the portal looked like:
Next, I made the hub carriers from Delrin.
Looks good but the axles are about 1/4 inch too long! Time to make suspension arms!
As for the tires, I have always been a fan of the Krimson Krusher and wanted similar tires.
Well, that is it for now until the 3/8" Delrin sheets and band saw blade arrives.
-
Very nice work and inspirational! So much so that I have started taking apart my Nikko Thor to modify it!
-
2
-
-
How much for 9, 10, and 16?


Nikko F150 twin 540 motor MT Project.
in Nikko
Posted
It’s always fun to see that beast in action! I especially liked the slow motion around the turn as it appears the truck was drifting!